
Design a security camera system by starting with a site survey, setting pixel-density targets for each camera’s mission, then sizing lens choice, network and PoE capacity, and storage to hit those targets before anything gets mounted. Authorities like CISA and NIST set the cybersecurity and segmentation rules, and Some security camera installers apply that same sequence on real properties across New Jersey.
TL;DR:
- Proper site surveys are essential to determine pixel-density targets and placement, preventing system failure and costly replacements.
- Camera positioning must meet specific pixel-per-foot goals, with different zones requiring detection, recognition, or identification levels.
- Network and PoE capacity must be accurately sized, adding buffer for future expansion to avoid bandwidth and power issues.
- Storage calculations should account for bitrate, retention period, and codec choice, with RAID and surveillance drives recommended for reliability.
- Network security requires segmenting camera traffic, updating firmware regularly, and using secure remote access to minimize vulnerability risks.
Table of Contents
- Site survey and requirements gathering
- Where to place cameras and how far they need to see
- Working out lens, field of view, and pixel density
- Sizing the network, PoE budget, and switches
- Calculating storage, retention, and redundancy
- Locking down the network against camera vulnerabilities
- Testing and handing off the finished system
- Standards and rules that shape the design
- What years of New Jersey installations have taught us
- What actually matters versus what sounds impressive
- Getting a custom design and site survey from Central Jersey Security Cameras
- FAQ
- Sources
Site survey and requirements gathering
A camera system designed without a proper site survey tends to fail at the one job it was bought to do: produce usable evidence. The survey is where stakeholder goals turn into measurable requirements, and skipping it is the single most common reason systems get replaced within a few years.
A useful survey captures far more than a walk-through. It should document:
- Site drawings or floor plans marking entrances, parking, loading docks, and cash-handling areas.
- Photos and light readings taken at different times of day, since a lot of blind spots only appear at dusk or under sodium lighting.
- Existing cable routes, conduit, and available mounting surfaces, which often decide whether a job is a quick install or a structured cabling project.
- Power availability near each proposed camera location, including whether PoE switches or local outlets are realistic.
- Activity patterns: foot traffic, vehicle flow, and the specific incidents the client wants to catch (shoplifting, vandalism, package theft, loitering).
Once those inputs are collected, each goal gets translated into a camera mission. “We need to identify faces at the entrance” becomes a specific pixel-density target. “We need six months of footage for insurance claims” becomes a retention requirement that drives storage math later in the design. Budget constraints, roof pitch, siding material, and whether a building already has structured cabling all shape which cameras and mounts actually make sense, not just which ones look best on a spec sheet. A design that ignores these constraints usually gets re-quoted twice before installation even starts.
Where to place cameras and how far they need to see
Camera placement is where pixel-density targets meet physical geometry. The industry shorthand for this is DORI (detect, observe, recognize, identify), and the practical version designers use is pixels-per-foot, or PPF. Field guides commonly peg detection at roughly 20 to 25 PPF, recognition at 40 to 50 PPF, and identification at 80 or more PPF, meaning a camera that looks fine on a monitor can still be useless in court if the pixel density at the target plane falls short.
Placement patterns follow from the mission:
- Entrances need identification-level density on the face plane, usually meaning a dedicated camera close to the door rather than one wide shot covering the whole lobby.
- Parking lots can run at recognition level for general coverage, with a second camera at identification level on license plates near the exit lane.
- Cash areas and points of sale need tight, fixed framing at identification density, since motion and angle changes there matter more than anywhere else on the property.
- Service yards and perimeters often work at detection level, since the job is noticing movement, not reading a face from 150 feet away.
Blind spots usually come from overlapping two cameras that both assumed the other would cover a corner. Mounting height matters too: 9 to 12 feet is a common range for entrances, high enough to resist tampering but low enough to avoid a steep, face-obscuring downward angle. Housings rated for the local climate (vandal-resistant domes, IK-rated enclosures, weatherproof bullet cameras) protect the investment in harsh exposure, and glare from direct sun or headlights at specific hours is worth checking during the survey, not after installation.
Pro Tip: Walk the site at the same time of day the incidents you’re worried about actually happen, not just during a convenient midday visit.
Working out lens, field of view, and pixel density
Once placement is set, the geometry has to confirm the camera can actually deliver the pixel density its mission requires. The core calculation is simple but easy to skip: the camera’s horizontal resolution in pixels divided by the scene width in feet at the target distance gives you PPF.
- Measure or estimate the scene width at the critical distance, such as the width of a doorway at eight feet.
- Check the camera’s horizontal resolution, for example 2,560 pixels on a 5-megapixel sensor.
- Divide resolution by scene width to get PPF: 2,560 pixels divided by a 10-foot scene width equals 256 PPF, well above identification level.
- If the target distance doubles, scene width roughly doubles too, cutting PPF by half, which is why a camera that performed fine at 10 feet can fail at 20 feet.
- When PPF comes in short, the fix is often a longer focal length or a narrower field of view, not simply a higher-resolution sensor, since a wide lens spreads the same pixels over more scene.
For a worked example: a 4-megapixel camera with 2,688 horizontal pixels aimed at a 15-foot-wide parking aisle delivers about 179 PPF, comfortably past recognition level but short of identification. Narrowing the lens to cover a 7-foot license-plate zone instead would push that past 380 PPF.
Doing this math by hand for a dozen cameras gets tedious fast, which is why online calculators and FOV visualization tools exist. For straightforward retail or home layouts, a basic lens calculator is usually enough. For warehouses, large parking structures, or multi-building campuses, a 3D design tool that models DORI zones before purchase saves real rework, since repositioning a camera after conduit is run costs far more than catching the gap on a floor plan.
Sizing the network, PoE budget, and switches
The network layer is where a lot of otherwise well-placed camera systems fall apart, usually from an undersized PoE switch or an uplink that chokes during a multi-camera playback request. A practical PoE budget adds up each camera’s power draw, typically 6 to 25 watts depending on whether it has heaters, IR illuminators, or PTZ motors, then adds a safety margin.
- Sum the rated wattage of every camera on a switch, then add roughly 20% headroom for inrush current and future additions.
- Compare that total against the switch’s PoE budget, not just its port count, since many switches can’t power every port at full load simultaneously.
- Size the uplink by adding each camera’s expected bitrate together, then adding margin for simultaneous live viewing and playback requests from the recorder.
- Choose 1GbE uplinks for smaller camera counts and 10GbE or SFP fiber links once a site runs 24 or more high-resolution streams through a single switch.
- Segment cameras onto their own VLAN and apply QoS marking (DSCP) so video traffic doesn’t compete with office data during peak hours.
Managed switches with port-level monitoring make it far easier to spot a camera drawing more power than expected or a port flapping on bad cable, both common symptoms of a wiring problem that would otherwise show up as mysterious dropped footage weeks later.
Pro Tip: Budget PoE and bandwidth for the cameras you plan to add in two years, not just the ones in this quote.
Calculating storage, retention, and redundancy
Storage is the cost most designs get wrong, usually by underestimating how fast bitrate turns into terabytes once retention stretches past a month. The standard formula is: daily storage per camera equals bitrate in kilobits per second multiplied by 10, which gives megabytes per day. Multiply that by the number of cameras and the retention period in days, then convert to terabytes, and the number is often bigger than expected.
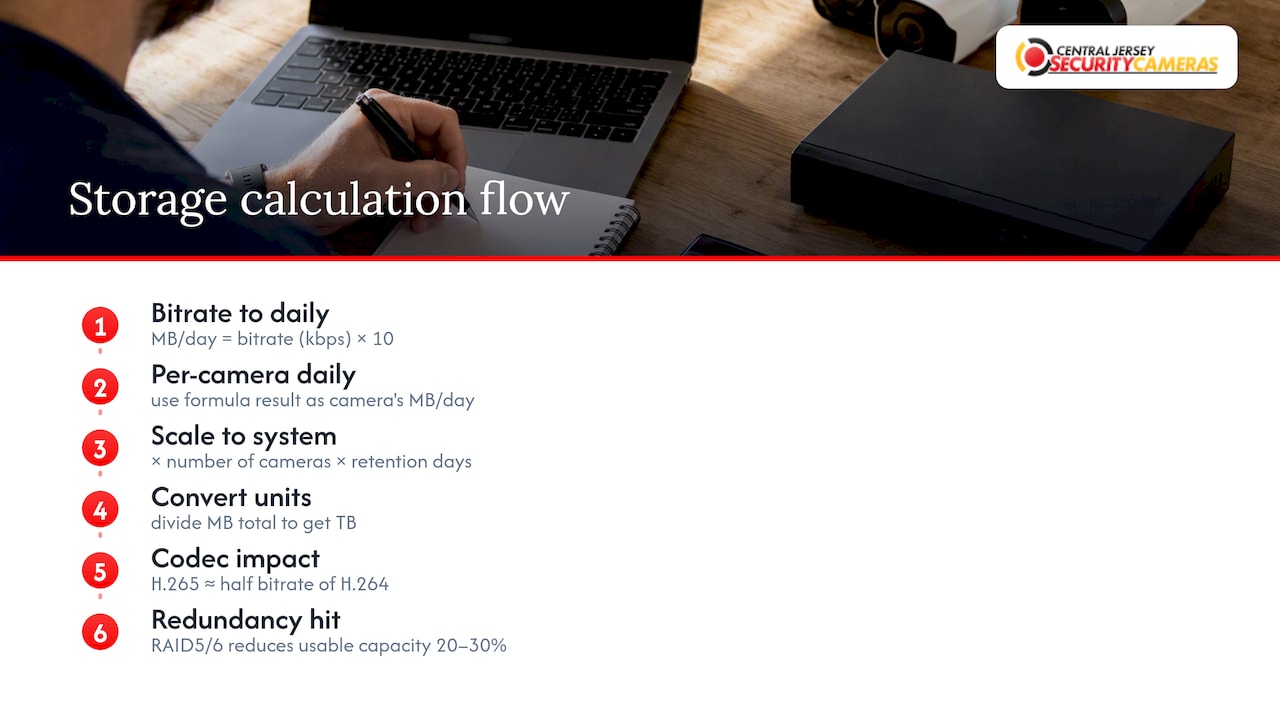
H.265 typically holds similar image quality at about half the bitrate of H.264, which is why most new designs default to it unless an existing NVR fleet only supports the older codec. Surveillance-rated hard drives are built for constant write cycles and are worth the premium over standard desktop drives in any system running around the clock. On sites where downtime is costly, RAID 5 or RAID 6 configurations trade some usable capacity (often 20 to 30% less than raw drive totals) for the ability to survive a drive failure without losing footage, which matters most for retailers or facilities facing insurance or compliance deadlines tied to their storage and coverage planning.
Locking down the network against camera vulnerabilities
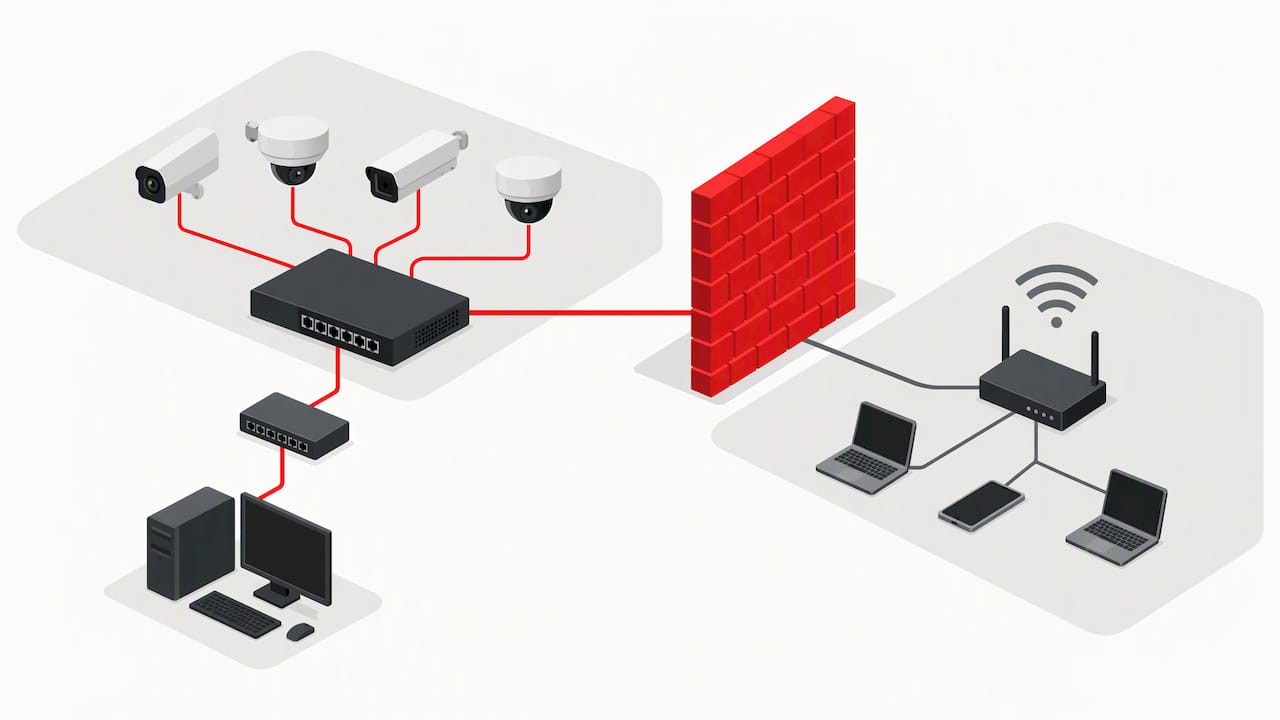
Cameras are small embedded computers, and that makes them a target. CISA advisories consistently point to minimizing network exposure, isolating camera control traffic from business networks, and using secure remote-access methods instead of opening device ports directly to the internet, since command injection and hard-coded credential flaws have repeatedly shown up in network camera firmware.
- Put cameras and recorders on their own VLAN or a dedicated subnet, never mixed in with office workstations or guest Wi-Fi.
- Never expose a camera or NVR’s management port directly to the internet; use a VPN or vendor-supported secure cloud relay instead.
- Change every default username and password before a camera goes live, and disable any service (Telnet, UPnP, unused web ports) the installation doesn’t need.
- Apply firmware updates on a schedule rather than only after a public vulnerability makes the news, since patches often lag disclosure by weeks.
- Require multi-factor authentication for any remote management access to the NVR or camera dashboard.
- Review access logs periodically and run a basic vulnerability check against the camera fleet at least once or twice a year.
NIST’s OT security guidance treats physical security devices as part of the operational technology environment, recommending zero-trust segmentation and defense-in-depth rather than a flat network where a compromised camera can reach payroll servers. A partner resource on zero-trust for small business breaks this down for organizations without a dedicated security team, and it’s worth coordinating these policies with whoever manages the broader IT environment rather than treating cameras as a separate, forgotten system. Central Jersey Security Cameras covers this groundwork in more detail in its commercial camera cybersecurity basics guide.
Pro Tip: Treat the camera network the same way you’d treat a point-of-sale network: segmented, patched, and never bridged to guest Wi-Fi.
Testing and handing off the finished system
A design isn’t finished until every camera is verified against the mission it was placed to serve, not just powered on and pointed roughly the right way.
- Walk each camera individually, confirming field of view and pixel density match the original PPF target, especially at entrances and point-of-sale zones.
- Test low-light performance at the actual time of day the camera’s mission requires it, not just during a daytime walkthrough.
- Trigger tamper alarms and confirm the housing resists the expected abuse for its location.
- Confirm stream stability under load, run a playback test for footage recorded hours earlier, and verify the recorder is actually meeting its retention target.
- Hand over a documentation package: a camera schedule, a network single-line diagram, a bill of materials, a commissioning report, and a signed acceptance form.
Skipping this step is how a system passes a quick glance at install but fails the first time someone actually needs footage.
Standards and rules that shape the design
A handful of outside standards and guidance documents quietly constrain most of the decisions above. IEC and EN pixel-density guidance underpins the DORI framework used throughout camera placement, giving designers a common language for detect, observe, recognize, and identify zones. NIST’s OT security publications extend beyond cameras into any physical security device touching a business network.
- OSHA’s workplace violence prevention guidance recommends clear visibility of entrances and adequate lighting, both of which camera placement should reinforce rather than fight against.
- Privacy law varies by jurisdiction, but the general rule holds everywhere: avoid recording in restrooms, locker rooms, or anywhere a reasonable person expects privacy.
- Lighting and sightline recommendations from facility safety guidance often double as camera placement guidance, since both aim at the same blind spots.
What years of New Jersey installations have taught us
Security camera installers design and install custom CCTV and IP camera systems for homes, businesses, warehouses, schools, and industrial sites across various counties in New Jersey. The recurring lesson from that work: the cheapest design and the best design are rarely the same quote, and the gap usually shows up in storage retention or network capacity, not camera count. A client who trims the NVR to save a few hundred dollars often pays more later re-wiring a switch that can’t handle growth.
What actually matters versus what sounds impressive
The camera megapixel count gets most of the attention in sales conversations, but it’s rarely the reason a system underperforms. A 4K camera with the wrong lens, poor lighting, or an undersized network behind it delivers worse evidence than a modest camera placed correctly with the right focal length and solid storage math behind it.
The conventional advice to “buy the highest resolution you can afford” skips the geometry that actually determines whether a camera can read a face or a plate. Pixel density at the target plane, not sensor specification, decides whether footage holds up when it matters. Cybersecurity gets treated as an afterthought almost everywhere, even though an unpatched, internet-exposed camera is a liability, not a security asset.
If there’s one thing to prioritize first, it’s the site survey paired with pixel-density targets before any equipment gets selected. Everything downstream, lens choice, network sizing, storage, follows from getting that first step right. Skip it, and no amount of resolution or channel count fixes the gap later.
— Tom
Getting a custom design and site survey from Central Jersey Security Cameras
Central Jersey Security Cameras designs and installs custom CCTV and IP camera systems, backed by ongoing alarm monitoring starting at $24.95 per month and a $99 one-time installation fee for new camera installations. Request a free on-site evaluation and get a design built around your property’s actual layout, not a generic package.
FAQ
What is the most watched country in the world?
Published rankings of camera density per capita vary by source and year, and this article does not track that figure. Focus instead on whether your own property’s coverage meets its detection, recognition, and identification goals.
Is there a free security camera layout planner available?
Several online tools offer free tiers for basic field-of-view and placement planning, useful for small residential or retail layouts. Larger or more complex sites generally benefit from a professional site survey and a 3D design tool instead.
What are the four types of security cameras?
Common categories include dome cameras, bullet cameras, PTZ (pan-tilt-zoom) cameras, and turret cameras, each suited to different mounting locations and coverage needs. Dome and turret cameras work well for discreet indoor or ceiling mounting, while bullet and PTZ cameras handle longer-range or wide-area outdoor coverage.
Can I set up my own security camera system?
Basic consumer camera kits can be self-installed for simple needs like a front door or backyard. Systems requiring precise pixel-density targets, structured network design, or storage calculated for compliance and retention generally call for a professional site survey and installation.
Sources
- CISA cybersecurity advisories
- OSHA workplace violence prevention guidance / visibility checklist
- NIST SP 800-82 (OT security guidance)
- Video surveillance and CCTV system design field guide