
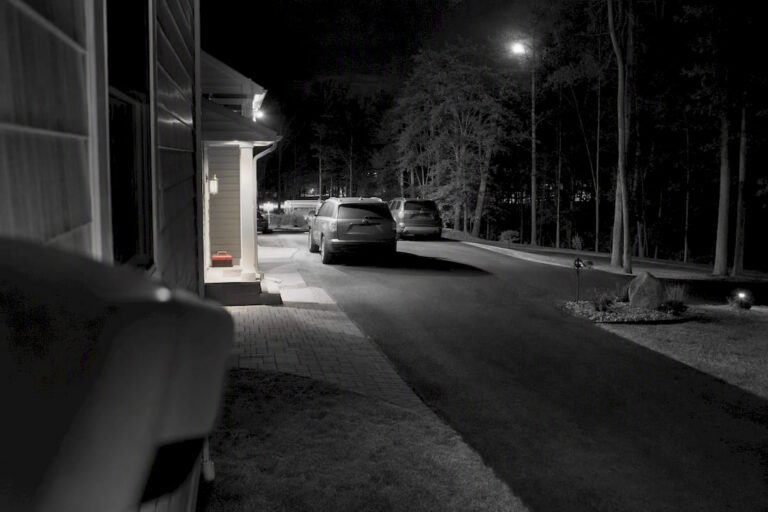
For most homeowners, infrared cameras are the right call for perimeter coverage, while color night vision earns its keep at entryways and driveways where you need to identify a face or a plate. Starlight sensors sit between the two, best for yards with a porch light or streetlamp nearby. Skip to the checklist below if you already know your use case; keep reading if you don’t.
TL;DR:
- Infrared cameras are best for covert perimeter surveillance with a minimum outdoor range of 40 feet, especially in zero ambient light conditions.
- Color night vision enhances forensic identification at entry points or driveways but exposes visible lights that can reveal camera location.
- Starlight sensors perform well in yards with existing light sources, offering a balance of color footage and concealment, though they are more costly and less effective in total darkness.
- Proper installation, including correct mounting height and aiming, is crucial to maximize night vision performance and avoid common issues like IR bloom or obstruction.
- Regular maintenance of camera housings, IR arrays, and lenses is essential for sustained night performance, with PoE power preferred for reliability over Wi-Fi or batteries.
Table of Contents
- Night Vision Security Cameras: The Three Technologies Explained
- Which Camera Technology Fits Your Situation?
- What Specs Actually Matter for Night Performance?
- DIY or Professional Installation for Night Vision Systems?
- How Professional Design Improves Night Surveillance Reliability
- Is It Legal to Run Night Vision Cameras on Your Property?
- How Do You Maintain a Night Vision Camera Over Time?
- What Power Setup Keeps Cameras Running All Night?
- Will a Night Vision Camera Work With Your Existing System?
- Your Night Vision Buying Checklist
- Get a Night Vision System Built for Your Property
- Sources
Night Vision Security Cameras: The Three Technologies Explained
Every night vision security camera on the market relies on one of three approaches, and the differences matter more than most product listings let on.
Infrared (IR) cameras use invisible IR LEDs to illuminate a scene, then capture that reflected light in black and white. This is the oldest and most common approach, and it’s still the right choice for a lot of jobs. The camera doesn’t announce itself with a visible glow, and IR tends to reach farther into darkness than a comparable color setup. The trade off is obvious: you get grayscale footage, and grayscale doesn’t tell you if the car in your driveway was blue or black.
Color night vision (sometimes called spotlight-assisted night vision) flips that trade off. These cameras use a built-in spotlight or an unusually sensitive sensor to pull in enough visible light to render full color, even after dark. That’s a real advantage for forensic identification. A police report wants “dark green sedan,” not “dark colored vehicle.” The catch is that a visible light source tells anyone nearby exactly where your camera is and what it’s watching, which defeats the purpose if discretion matters to you.
Starlight or low-light sensors try to split the difference. These use larger image sensors and heavier processing to amplify whatever ambient light already exists (a streetlamp, a neighbor’s porch light, moonlight) into a usable color image without firing a spotlight. Manufacturer technologies marketed under names like ColorPro fall into this category. When there’s some ambient light to work with, this can be the best of both worlds. When there isn’t, performance drops off fast, and these cameras generally cost more than a standard IR unit.
A few quick examples of where each shines:
- A wooded side yard with zero ambient light: IR, every time.
- A gated business entrance where you need plate and clothing color for insurance claims: color night vision.
- A suburban driveway near a working streetlight: starlight sensor, often the sharpest option available.
Security backs this pattern: IR consistently performs better for covert surveillance, while color night vision wins for forensic identification tasks like reading a shirt color or a car’s paint.
Which Camera Technology Fits Your Situation?
Matching the technology to the job is the single biggest decision you’ll make before you ever look at brand names or price tags. Here’s how to think through the most common scenarios homeowners and small business owners actually face.
-
Covert perimeter monitoring (back fence, side gate, tree line). IR is the clear choice here. You want range, not color, and you don’t want the camera advertising its own position with a visible light. Safehome recommends a minimum outdoor night vision range of 40 feet for perimeter work, and you’ll want a narrower field of view if identification (not just motion detection) is the goal. A wide lens spreads pixels thin across the frame, and a face at 35 feet on a wide-angle camera can turn into an unreadable smudge.
-
Driveways, parking lots, and forensic identification. This is color night vision’s home turf, or a two-camera setup pairing IR for range with a color spotlight camera for the approach zone. If plate capture specifically matters, a dedicated license plate recognition camera mounted closer to the lane will outperform a wide color camera trying to do everything at once. Plate characters are small, and a general-purpose camera rarely has the pixel density at range to read them reliably.
-
Indoor entryways and hallways. Shorter distances mean shorter requirements. A 20-foot indoor night vision range covers most hallways and foyers, and either IR or a starlight sensor works fine since ambient light indoors (a hallway nightlight, a TV glow) is usually more consistent than outdoors.
-
Low-light suburban yards with some ambient light. If there’s a streetlamp, a neighbor’s floodlight, or even consistent moonlight in an open area, starlight sensors often outperform both plain IR and color night vision, delivering usable color without a visible spotlight.
Two quick example setups: a small home with a fenced backyard and a front porch might run IR on the back fence line and a color or starlight camera at the front door, where guests and packages need identification. A small retail storefront might run IR across the rear loading area and a dedicated color or LPR camera on the customer parking lot.
What Specs Actually Matter for Night Performance?
Camera listings throw a wall of numbers at you, and most of them are marketing noise. A few genuinely predict how a camera performs after dark.
- Sensor size and low-lux rating. Bigger sensors gather more light per pixel, which means cleaner, less grainy footage at night. A low lux rating (look for a specific number, not just “starlight” branding) tells you how little light the sensor needs before the image degrades. Reolink’s guidance notes that larger sensors and wider apertures directly reduce noise and improve color rendering in low light.
- Aperture (f-number). A lower f-number (f/1.6 versus f/2.0, for instance) means the lens lets in more light, which matters more at night than during the day.
- Resolution versus field of view. A 4K camera covering a 110 degree field of view can still fail to identify a face at 40 feet, because those pixels are spread across a huge scene. Match resolution to how tight or wide you actually need the view.
- IR illuminator specs. Manufacturer “night vision range” numbers usually describe the maximum distance the IR LEDs illuminate anything at all, not the distance at which you could actually identify a person. Reolink’s own research points out that identification range is typically shorter than the advertised illumination range.
- WDR and anti-bloom. Wide dynamic range and anti-bloom processing keep a camera from washing out completely when a car’s headlights or a flashlight sweep across the frame at night. This is where cheap cameras fail hardest.
- Power and storage. PoE (Power over Ethernet) is worth requesting over Wi-Fi or battery power for anything permanent, since it delivers stable power and a wired connection with no signal drops. Pair it with an NVR or cloud storage plan that actually retains footage long enough to matter.
Pro Tip: Ask any seller to show you sample footage from the exact model, at night, ideally with a car passing through frame. Advertised range numbers are close to meaningless until you’ve seen what the camera actually resolves in the dark.
DIY or Professional Installation for Night Vision Systems?
A camera with excellent specs on paper can still perform poorly if it’s mounted wrong, and mounting mistakes are the single most common reason night vision footage disappoints people.
Professional installation earns its cost on larger properties, multi-camera NVR setups, license plate recognition cameras that need precise lane alignment, and PTZ cameras that need to be tuned for both daytime and nighttime tracking. A site survey catches problems before they become permanent, wiring issues, sightline obstructions, glare sources, that a homeowner installing solo often won’t notice until the first dark night.
Common DIY pitfalls include:
- Mounting too high, which shrinks the useful field of view at ground level.
- Aiming a camera at or near a streetlamp, which causes IR bloom and washes out everything else in frame.
- Pointing through a window, which reflects the camera’s own IR light straight back into the lens.
- Ignoring vegetation growth that will block the lens within a season.
For placement, a mounting height of 8 to 10 feet with a slight downward tilt generally balances coverage and identification range for most home applications. Trim back vegetation regularly, and keep IR-equipped cameras away from reflective surfaces.
Cost and timeline vary widely: a single DIY camera can be running within an hour, while a professionally installed multi-camera system with NVR configuration typically takes a full day and represents a bigger investment, one that pays off in coverage that actually holds up over years, not months.
How Professional Design Improves Night Surveillance Reliability
A site survey catches the mistakes that ruin night footage before a single camera goes up: a streetlamp in frame, a reflective window, a mounting height that clips faces out of the picture. That’s the value a professional visit adds over guessing from a ladder.
Professional installers handle this end to end for properties with on-site surveys, camera selection matched to actual lighting conditions, PoE and NVR installation for stable uninterrupted recording, and dedicated PTZ and license plate recognition camera installs where forensic detail matters most. Ongoing maintenance contracts keep IR illuminators and lenses performing the way they did on day one, not degrading quietly for months before anyone notices.
Is It Legal to Run Night Vision Cameras on Your Property?
Recording your own property, including at night, is generally permitted across the United States, but the details shift depending on what the camera can see and hear. Cameras aimed strictly at your own yard, driveway, or entryway are rarely an issue. Problems start when a lens captures a neighbor’s yard, a window, or shared space in a way that could be considered an invasion of privacy, and several states treat audio recording differently than video, sometimes requiring consent from anyone being recorded.
Posting a visible notice that a property is under surveillance is a smart practice even where it isn’t strictly required. It can also serve as a deterrent on its own, which is part of why surveillance signage remains common even on properties with covert IR systems running quietly in the background.
Local ordinances occasionally restrict where cameras can point, particularly in dense residential areas or shared driveways, so it’s worth a quick check with your municipality before finalizing camera placement, especially for angles that might sweep across a neighbor’s property. None of this should replace an actual conversation with a local attorney if your situation involves shared property lines, tenants, or employees, since the legal considerations shift with each of those.
How Do You Maintain a Night Vision Camera Over Time?
Night vision performance degrades quietly, which is exactly why maintenance gets skipped. A camera that looks fine during the day can be nearly useless at 2 a.m. because nobody noticed the lens fogging or the IR array collecting dust.
IR LEDs and the lens housing around them need periodic wiping down, especially outdoors where pollen, dust, and spider webs accumulate directly in front of the illuminators. A thin film of grime scatters IR light back into the lens instead of out into the scene, which shows up as a hazy, washed out image that looks like a hardware failure but isn’t. Check housings seasonally, and more often near trees or in high pollen months.
Spider webs deserve a special mention. They’re nearly invisible in daylight but glow brightly under IR illumination at night, and they’re one of the most common reasons a homeowner calls a technician convinced the camera is broken. A quick wipe usually solves it.
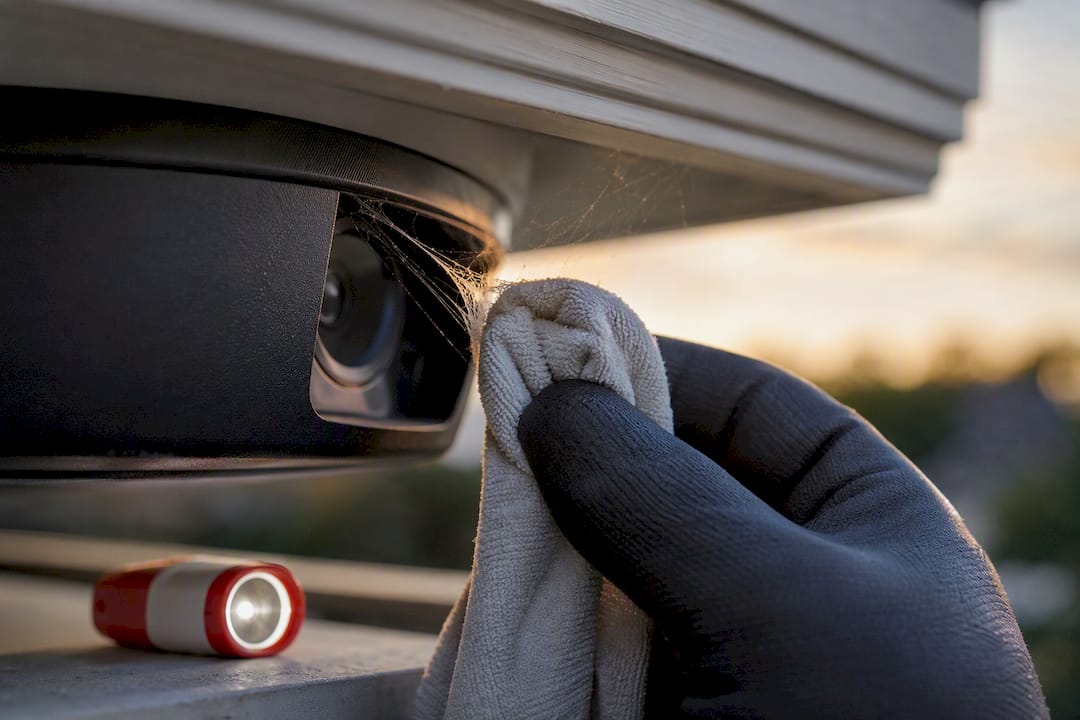
Keep an eye on housing seals too. Moisture inside a camera housing fogs the lens and can eventually damage the sensor. Clean exterior fixtures and glass around cameras on the same schedule you’d use for outdoor lighting; a partner guide on exterior lighting cleanliness covers similar upkeep that applies just as well to camera housings mounted nearby. For a full seasonal routine, Central Jersey Security Cameras’ maintenance guide walks through what to check and how often.
What Power Setup Keeps Cameras Running All Night?
Power interruptions are the most overlooked way a night vision system fails, because they happen silently and usually get discovered only after something goes wrong on camera and there’s no footage to show for it.
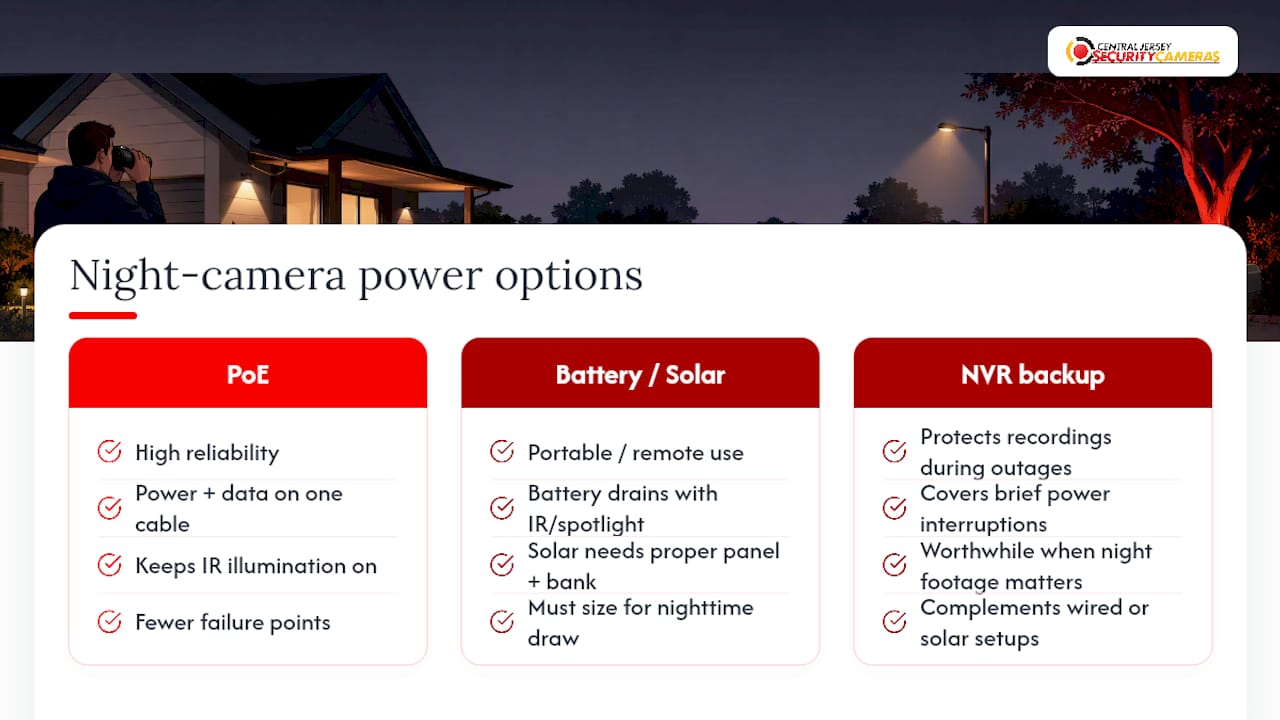
PoE (Power over Ethernet) is the most reliable option for permanent installations. A single cable carries both power and data, which eliminates the separate power adapters and outlets that tend to fail, get unplugged, or get exposed to weather. Reolink’s low-light camera guidance notes that PoE setups reduce failure points and keep IR illumination powered continuously, which matters most exactly when you need footage most.
Battery-powered and solar cameras have a place, particularly for remote structures, sheds, or gates too far from any wired connection. But battery power and constant IR illumination or a color spotlight don’t mix well; the more light a camera produces, the faster it drains a battery, and that trade off gets worse as nights get longer in winter. A solar-powered camera installation with a properly sized panel and battery bank can offset this, but it needs to be sized for your specific camera’s nighttime draw, not just its average daytime usage.
For any system where nighttime footage genuinely matters, a battery backup on the NVR itself is worth the investment. A brief power outage shouldn’t mean a gap in recording during the exact hours you’re relying on the system most.
Will a Night Vision Camera Work With Your Existing System?
Most modern IP cameras, including night vision models, are built around standard protocols like ONVIF, which lets cameras from different manufacturers talk to the same NVR or recording software without a lot of custom configuration. That said, mixing brands still introduces friction: firmware quirks, slightly different motion detection behavior, and inconsistent app experiences if you’re trying to view everything in one place.
If you already have an NVR-based system, adding a compatible night vision camera is usually straightforward as long as it matches your existing PoE switch capacity and resolution requirements. Smart home integration is a separate question. Many systems now tie into platforms for voice control or automated lighting triggers, but the depth of that integration varies a lot between consumer and professional grade equipment, so it’s worth confirming compatibility before assuming a new camera will slot cleanly into whatever smart home setup you’re already running.
Your Night Vision Buying Checklist
Before you sign anything, confirm three must haves: the camera’s core technology (IR, color, or starlight) actually matches your use case, the night vision range meets or beats the 40 foot outdoor or 20 foot indoor minimums, and the camera runs on PoE or another power source you trust to stay online.
Nice to haves worth paying a little extra for: a color night vision option for entry points, WDR to handle headlights and flashlights without washing out, and smart detection filters that cut down on false alerts from moving branches or passing animals.
One negotiation tip: ask any installer for a site survey before you commit, and ask whether they’ll guarantee night performance with a follow-up tuning visit if the footage doesn’t hold up once it’s dark. A vendor confident in their work won’t hesitate on that.
— Tom
Get a Night Vision System Built for Your Property
Night vision systems for homes and businesses across Central New Jersey, covering Ocean, Monmouth, Middlesex, Mercer, and Burlington counties, are designed and installed by professional security providers.
That starts with a site survey, not a sales pitch: a technician walks your property, checks ambient light sources, and recommends the specific mix of IR, color, or starlight cameras that fits each area, whether that’s a covert perimeter camera on the back fence or a color-capable unit watching the front door. From there, we handle PoE wiring, NVR configuration, and installs for PTZ or license plate recognition cameras where forensic detail matters. Ongoing maintenance keeps IR illuminators clean and lenses clear long after installation day.
To get a quote, have a few photos of the areas you want covered, a sense of your priority zones (driveway, entrances, perimeter), and a rough budget range ready. Visit our home security camera installation page to schedule an on-site survey and get a system built around how your property actually looks after dark.