
A camera’s field of view (FOV) is the angular extent of the scene it can capture at any given moment. For rectilinear lenses, the formula is: FOV = 2 × arctan(sensor_dimension / (2 × focal_length)). That single equation applies to all three axes: horizontal (HFOV), vertical (VFOV), and diagonal (DFOV). Manufacturers most often quote HFOV, so that’s the number to compare when shopping lenses or planning camera placement.
Key Takeaways
Camera field of view is fully determined by focal length and sensor active dimensions; use the HFOV/VFOV/DFOV formulas to get exact angles, then verify pixel density against DORI thresholds at the real slant range before finalizing any installation.
| Point | Details |
|---|---|
| Core FOV formula | FOV = 2 × arctan(sensor_dimension / (2 × focal_length)) applies to all three axes. |
| Sensor size changes everything | The same lens produces 68° HFOV on a 1/2.8" sensor but only 40° on a full-frame; use active mm dimensions, not optical-format fractions. |
| PPM drives DORI compliance | A 4MP camera with a 4mm lens at 10m delivers 199 PPM (Recognition); an 8mm lens at the same distance delivers 401 PPM (Identification). |
| Slant range, not floor distance | Always calculate PPM at the actual slant range; a 3m-high camera covering an 8m floor distance has an 8.5m slant range. |
| Repositioning beats a lens swap | Reducing working distance by 20% raises PPM by roughly 25%, often enough to reach the next DORI tier without new hardware. |
Table of Contents
- What determines a camera’s field of view?
- How do you calculate horizontal, vertical, and diagonal FOV?
- How does sensor size change the view for the same lens?
- Step-by-step worked examples
- How do you measure FOV on-site when specs are unknown?
- How professional installers use FOV and DORI in system design
- Common focal lengths and their approximate FOV on full-frame
- Practical ways to change your camera’s field of view
- What most FOV guides get wrong
- Sources
What determines a camera’s field of view?
Three physical factors drive FOV: focal length, sensor size, and working distance. Change any one of them and the angle shifts.
- Focal length: Shorter focal lengths produce wider angles; longer focal lengths narrow the view. A lens with a shorter focal length captures a significantly wider scene than one with a much longer focal length, by several times.
- Sensor active dimensions: A larger sensor captures more of the image circle a lens projects. The same 50mm lens produces a noticeably wider HFOV on a full-frame sensor than on a smaller APS-C sensor, because the APS-C chip captures a smaller slice of that circle. This ratio is the crop factor.
- Working distance: The angular FOV stays constant regardless of distance, but the linear coverage width grows proportionally. Double the distance and you double the scene width at the target plane.
Two related terms often get conflated. Angle of view is what the camera actually records, determined by sensor size and focal length. Angle of coverage is the full image circle a lens can project, which must be large enough to cover the sensor without vignetting. For most matched lens-sensor pairs this isn’t an issue, but it matters when adapting lenses across formats.
Aspect ratio also shapes how HFOV and VFOV relate. A 16:9 sensor and a 4:3 sensor with the same diagonal will have different horizontal and vertical angles, so a lens described as “wide” can behave very differently depending on the sensor shape.
How do you calculate horizontal, vertical, and diagonal FOV?
The three formulas share the same structure. Let W = sensor width, H = sensor height, D = sensor diagonal, and f = focal length (all in the same unit, typically millimeters):
- HFOV = 2 × arctan(W / (2f))
- VFOV = 2 × arctan(H / (2f))
- DFOV = 2 × arctan(D / (2f))
All four variables must be in the same unit. Mixing millimeters and inches is the most common calculation error.
Small-angle approximation: When angles are well below 10°, arctan(x) ≈ x in radians, so FOV ≈ sensor_dimension / focal_length (in radians). This is useful for telephoto lenses and machine-vision setups with narrow fields, but it breaks down fast for wide-angle work.
Aspect ratio and spec-sheet HFOV: A spec sheet that lists only HFOV tells you nothing about vertical coverage. For a doorway or corridor where height matters more than width, compute VFOV explicitly using the sensor height.
Fisheye and non-rectilinear lenses: The formulas above assume a rectilinear projection, where straight lines in the scene remain straight in the image. Fisheye lenses use equidistant or equisolid-angle projections, so the same formula gives a geometric angle that understates the actual captured scene. For those lenses, use the manufacturer’s projection model or dedicated fisheye FOV calculators. Barrel distortion in wide-angle rectilinear lenses also compresses the edges slightly, meaning the effective FOV at the frame edges is a bit narrower than the formula predicts.
How does sensor size change the view for the same lens?
Sensor format is the hidden variable most people underestimate. The table below lists active dimensions for common formats and their crop factor relative to a 35mm full-frame sensor (36 × 24 mm).
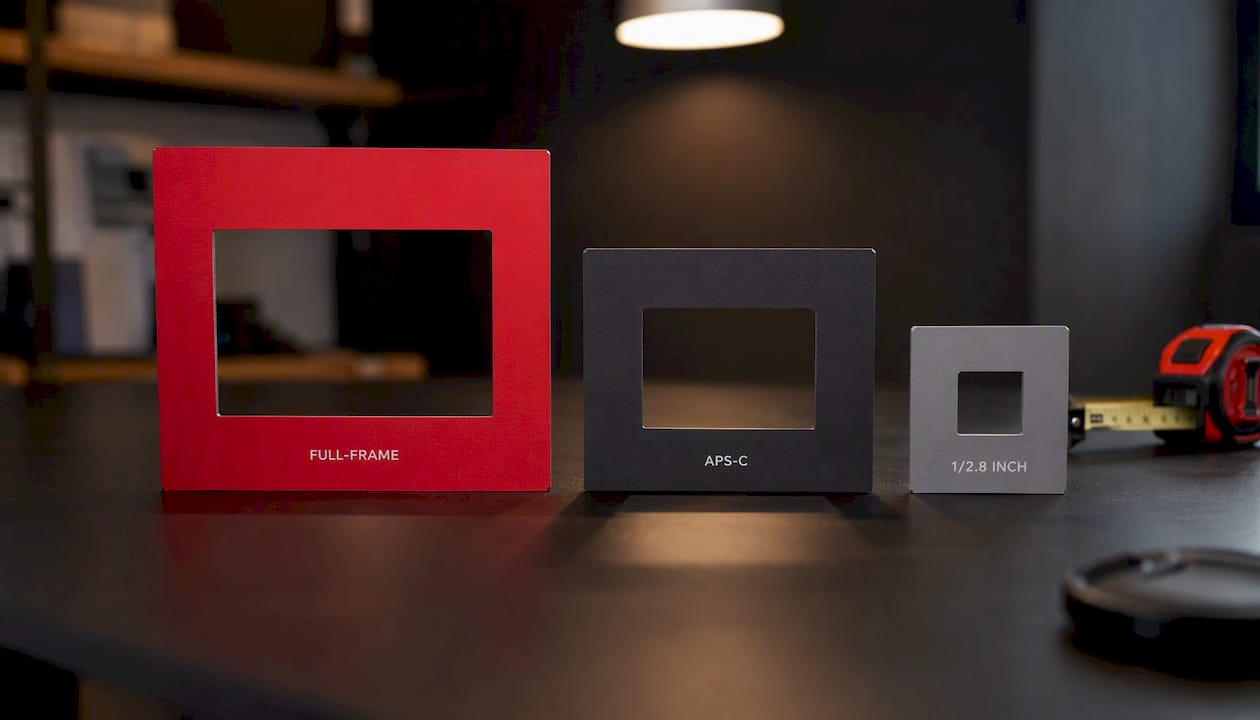
Conversion example: A 50mm lens on full-frame gives HFOV = 2 × arctan(36 / 100) = 39.6°. On an APS-C sensor (23.5mm wide), the same lens gives HFOV = 2 × arctan(23.5 / 100) = 26.5°. On a 1/2.8" security sensor (5.4mm wide), it gives just 6.2°, which is essentially a telephoto view.
A word on marketing labels: The “1/2.8 inch” notation is a legacy optical-format fraction inherited from vacuum-tube cameras. The actual active sensor area is much smaller than the fraction implies. Always use the real active millimeter dimensions from the datasheet or a verified calculator preset, not the inch-fraction label, or your FOV calculations will be significantly off.
Step-by-step worked examples
Photography example: 50mm lens on a full-frame sensor
- Gather inputs: Sensor width W = 36mm, sensor height H = 24mm, sensor diagonal D = 43.3mm, focal length f = 50mm.
- Calculate HFOV: 2 × arctan(36 / 100) = 2 × arctan(0.36) = 2 × 19.8° = 39.6°
- Calculate VFOV: 2 × arctan(24 / 100) = 2 × arctan(0.24) = 2 × 13.5° = 27.0°
- Calculate DFOV: 2 × arctan(43.3 / 100) = 2 × arctan(0.433) = 2 × 23.4° = 46.8°
- Verify units: All inputs in mm. ✓
- Interpret: At 10 meters, scene width = 2 × 10 × tan(19.8°) = 2 × 10 × 0.361 = 7.2 meters wide.
Security camera example: 1/2.8" sensor with 4mm and 8mm lenses
Inputs: Sensor width W = 5.4mm, sensor height H = 4.0mm. Camera resolution: 4MP (2688 × 1520 pixels). Target distance: 10 meters.
With a 4mm lens:
- HFOV = 2 × arctan(5.4 / 8) = 2 × arctan(0.675) = 2 × 34.0° = 68.0°
- Scene width at 10m = 2 × 10 × tan(34.0°) = 2 × 10 × 0.675 = 13.5 meters
- Pixels per meter (PPM) = 2688 pixels / 13.5m = 199 PPM
With an 8mm lens:
- HFOV = 2 × arctan(5.4 / 16) = 2 × arctan(0.3375) = 2 × 18.6° = 37.2°
- Scene width at 10m = 2 × 10 × tan(18.6°) = 2 × 10 × 0.337 = 6.7 meters
- PPM = 2688 / 6.7 = 401 PPM
DORI context: EN 62676-4 thresholds commonly used in security design set Detection at 25 PPM, Observation at 62 PPM, Recognition at 125 PPM, and Identification at 250 PPM. The 4mm lens at 10m delivers a pixel density consistent with Recognition-level detail, but below Identification. The 8mm lens at the same distance delivers higher pixel density, reaching Identification levels. If the goal is reading faces or license plates at 10 meters, the 8mm lens is the right call. The CCTV FOV Calculator automates this math and shows DORI zones graphically.
Checklist before running the math:
- Confirm sensor active dimensions in mm (not the optical-format fraction)
- Confirm focal length in mm
- Measure working distance along the optical axis, not the slant range
- Use horizontal pixel count for PPM calculations
How do you measure FOV on-site when specs are unknown?
Sometimes you’re working with an unlabeled camera or a lens with no datasheet. Here’s a practical procedure:
- Set up a known-size target (a ruler or tape measure) at a measured distance from the camera lens, perpendicular to the optical axis.
- Frame the target so its edges align with the left and right edges of the live image.
- Record the target width (W_target) and the distance (D).
- Calculate HFOV: HFOV = 2 × arctan(W_target / (2 × D))
- Derive focal length if needed: f = (W_sensor / W_target) × D, using the known sensor width.
Coverage width formula: Once you have HFOV, scene width at any distance is: Width = 2 × Distance × tan(HFOV / 2). This is the core planning formula for security camera layout.
IFOV and PPM: Instantaneous field of view (IFOV) is the angle subtended by a single pixel. PPM = horizontal pixel count / scene width. For DORI planning, always compute PPM at the maximum target distance, not the nominal or closest distance.
Installer checklist:
- Mount height and tilt angle: a camera tilted 30° downward has a slant range longer than the horizontal distance. Use slant range (not floor distance) in coverage calculations.
- Corridor mode: rotating a camera 90° uses VFOV as the horizontal sweep, which can double effective range in narrow hallways.
- Verify PPM at the worst-case slant angle, not just straight ahead along the optical axis.
- Check for barrel distortion at the frame edges; effective coverage at corners is slightly less than the formula predicts.
Pro Tip: Always verify your DORI calculation at the worst-case slant angle. A camera mounted at 3 meters height covering a target 8 meters away has a slant range of 8.5 meters, not 8. Running the PPM calculation at 8 meters and then mounting at that height will leave you short of your target pixel density at the actual target location.
How professional installers use FOV and DORI in system design
Good surveillance design isn’t about picking the widest lens and hoping for coverage. It’s about matching pixel density to the task at every point in the scene.
Key trade-offs installers work through:
- Coverage area vs. pixel density: A wide-angle lens covers more ground but spreads pixels thinner. A narrower lens concentrates resolution. For a parking lot entry, a 4mm lens might cover the lane width; for license plate reading at 15 meters, an 8mm or longer lens is usually required to hit Identification-level PPM.
- Low-light performance vs. sensor size: Larger sensors collect more light per pixel, which matters in dim environments. A 1/2" sensor outperforms a 1/3" sensor in low light even at the same megapixel count, but it changes the FOV for the same focal length.
- Fixed vs. varifocal lenses: Fixed lenses are simpler, cheaper, and optically stable. Varifocal lenses (typically ranging from 2.8mm to 12mm) let installers tune coverage during commissioning without swapping hardware. The trade-off is that varifocal lenses can introduce more distortion at the wide end and require refocusing after adjustment. For a retail environment where display layouts change, varifocal is often worth the extra cost. For a fixed entry point like a door or gate, a fixed lens is usually the better choice.
The standard installer workflow at Central Jersey Security Cameras follows a consistent sequence: site survey to map distances and lighting, FOV and DORI modeling for each camera position, physical installation, then on-site verification of pixel density and alarm-event review during commissioning. Skipping the verification step is where most DIY installs fall short.
For indoor surveillance applications like cash handling or fraud prevention, Identification-level PPM (250+) is typically the design target, which demands careful lens selection and precise placement. Computer vision analytics add another layer: object detection algorithms often require minimum PPM thresholds to function reliably, a factor covered in detail in computer vision integration planning.
Consulting a professional installer before finalizing camera positions is a design-level decision, not an afterthought. The math in this article gives you the framework; an on-site survey confirms whether the numbers hold in the real space.
Common focal lengths and their approximate FOV on full-frame
| Focal Length | Diagonal FOV (full-frame) | Approx. HFOV (full-frame) | Typical Use Case |
|---|---|---|---|
| — | 68° | 104° | Ultra-wide, architecture, interior |
| 24mm | 84° | 74° | Wide landscape, environmental portrait |
| 35mm | 63° | 54° | Street, documentary, wide portrait |
| 50mm | 47° | 40° | Normal/standard view, general use |
| 85mm | 29° | 24° | Portrait, medium-range surveillance |
| 135mm | 18° | 15° | Telephoto portrait, license plate read |
| 200mm | 12° | 10° | Long-range surveillance, sports |
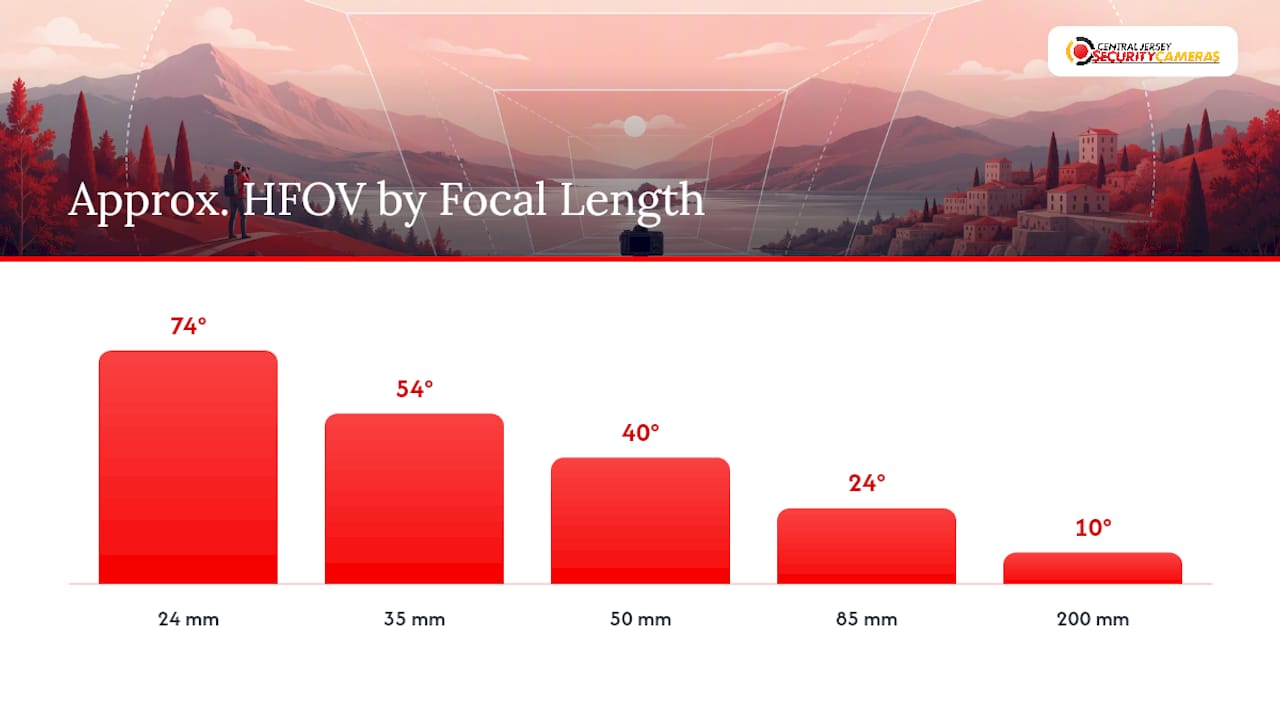
Adjusting for crop sensors: Multiply the focal length by the crop factor to find the full-frame equivalent. A 4mm lens on a 1/2.8" sensor (crop factor 6.4×) behaves like a 25.6mm lens on full-frame, giving roughly 68° HFOV. Use the EngineersUniverse FOV calculator to run exact numbers for any sensor/focal-length combination.
Practical ways to change your camera’s field of view
- Swap the lens focal length: The most direct option. Going from 4mm to 8mm halves the HFOV and doubles PPM at the same distance. Requires physical access to the camera and, for fixed-lens cameras, a hardware replacement.
- Use a varifocal lens: Lets you dial in the angle during commissioning without a lens swap. Varifocal lenses typically cover 2.8mm to 12mm, giving a wide adjustment range. Confirm image quality and distortion at both endpoints before locking in the setting.
- Reposition the camera: Moving the camera closer narrows the linear coverage width without changing the angular FOV. Moving it farther widens coverage but reduces PPM. Often the cheapest fix when the lens is already installed.
- Change mounting angle: Tilting the camera toward a specific zone sacrifices coverage of the near field in exchange for better reach. Useful when a single camera needs to cover a long corridor or driveway.
- Use a higher-resolution sensor: More pixels at the same FOV means more PPM. Upgrading from 2MP to 4MP on the same lens doubles pixel density, which can push a Recognition-level camera to Identification without touching the optics.
- Digital cropping (electronic zoom): Crops the sensor area digitally, effectively narrowing the FOV but at the cost of resolution. Useful for quick adjustments in software but not a substitute for proper optical design.
Pro Tip: *In an already-installed system, repositioning is almost always cheaper and faster than a lens swap. Before ordering new glass, measure whether moving the camera 1–2 meters closer achieves the PPM you need.
What most FOV guides get wrong
The standard advice is to pick a focal length based on the scene width you want to cover, then call it done. That’s fine for photography. For security camera design, it’s the wrong stopping point.
The number that actually matters is pixels per meter at the target, not the angle in degrees. Two cameras can share an identical 68° HFOV and produce completely different results: a 2MP camera at that angle fails Identification at 8 meters, while a 4MP camera at the same angle passes it. The angle is just the starting point. PPM is the deliverable.
The second thing most guides skip is slant range. Every worked example uses a clean horizontal distance, but real cameras mount on walls and ceilings. A camera at 3 meters height aimed at a target 8 meters away is actually imaging across 8.5 meters of slant range. Run the calculation at the slant range, every time.
Finally, the fixed vs. varifocal debate is usually framed as a cost question. It’s really a commissioning question. Varifocal lenses let you correct placement errors in the field without a return visit. For any installation where the exact mounting position isn’t confirmed before the camera goes up, that flexibility is worth more than the price difference. For a fixed entry point where the geometry is known in advance, a fixed lens is cleaner and more stable long-term.
Ready to get the coverage right the first time? Central Jersey Security Cameras designs and installs custom surveillance systems across Central New Jersey, including Ocean County, Monmouth County, Middlesex County, Mercer County, and Burlington County. Every installation includes on-site FOV verification and DORI confirmation at commissioning, not just a camera pointed in the right direction.

Schedule a professional installation consultation and get a system designed to meet your actual pixel-density requirements, not just your coverage area.
Sources
These tools let you run the math from this article live, without building your own spreadsheet:
- Field of view
- CCTV FOV Calculator — Field of View, DORI Zones & Pixel Density
- FOV Calculator: Free CCTV Camera Field of View Tool 2026
For quick HFOV lookups, the EngineersUniverse tool is the fastest. For full DORI planning across a multi-camera layout, the CCTV Design Tool gives the most complete picture.