
Good CCTV cable management comes down to five habits: choose the right cable for each camera, keep every run within its distance limit, route it away from power and sharp edges, protect it from weather, and label both ends so anyone can trace it later. Do those five things and the system stays clean, easy to service and far less likely to drop a camera in the rain. This guide walks through each one, including racks and fiber.
TL;DR
- Use Ethernet (Cat5e, Cat6 or better) for IP cameras and coax for analog ones. Keep copper Ethernet runs under 100 m (325 ft) total.
- Keep camera cable away from mains wiring, secure it every 18 to 24 inches, and never pull ties or staples tight enough to pinch the jacket.
- Outdoors, use UV-rated cable and ties, add a drip loop below every camera and seal entry points.
- In the rack, put patch panels at the top and power at the bottom, and use horizontal and vertical managers with spare capacity.
- Fiber carries video a long way but no power, so plan a PoE switch or media converter at the far end.
Table of Contents
- Start with the right cable for the camera
- Plan the routes before you pull anything
- Routing and securing cable indoors
- Outdoor runs: weather, sunlight and wildlife
- Organizing the rack or recorder closet
- When fiber makes sense for security cameras
- Inspecting and maintaining camera cabling
- Perspective: why we pull cable the way we do
- Let us handle the cabling
- FAQ
- Sources
Start with the right cable for the camera
Most cabling trouble starts before the first clip goes up. A mismatched cable, or a run that is too long, causes flicker and dropouts that no amount of tidy bundling will fix.
Security installers have long worked with three basic cable technologies: coaxial, unshielded twisted pair (UTP) and fiber. The same trade article notes that 75-ohm coax is the type most security contractors use, and that the common UTP cable is the Category 5, 5e or 6 telecom cable.
In practice, you choose by camera type:
| Camera type | Typical cable | What it carries | Practical notes |
|---|---|---|---|
| Analog (DVR system) | RG59 or RG6 coax, often siamese with a power conductor | Video, plus power on siamese | Coax is still found in many older buildings |
| IP camera (NVR system) | Cat5e, Cat6 or Cat6A Ethernet | Video, data and PoE power on one cable | Single cable per camera, easy to expand |
| Long or electrically noisy runs | Fiber (single-mode or multi-mode) | Data only | Needs separate power at the camera end |
If you are planning a new system, IP cameras on PoE simplify cable management the most, because one cable replaces separate video and power runs. We cover cable choice in more depth in our guide to the best Ethernet cable for cameras, and the PoE power budget checklist shows how many cameras a switch can actually feed.
Respect the distance limit
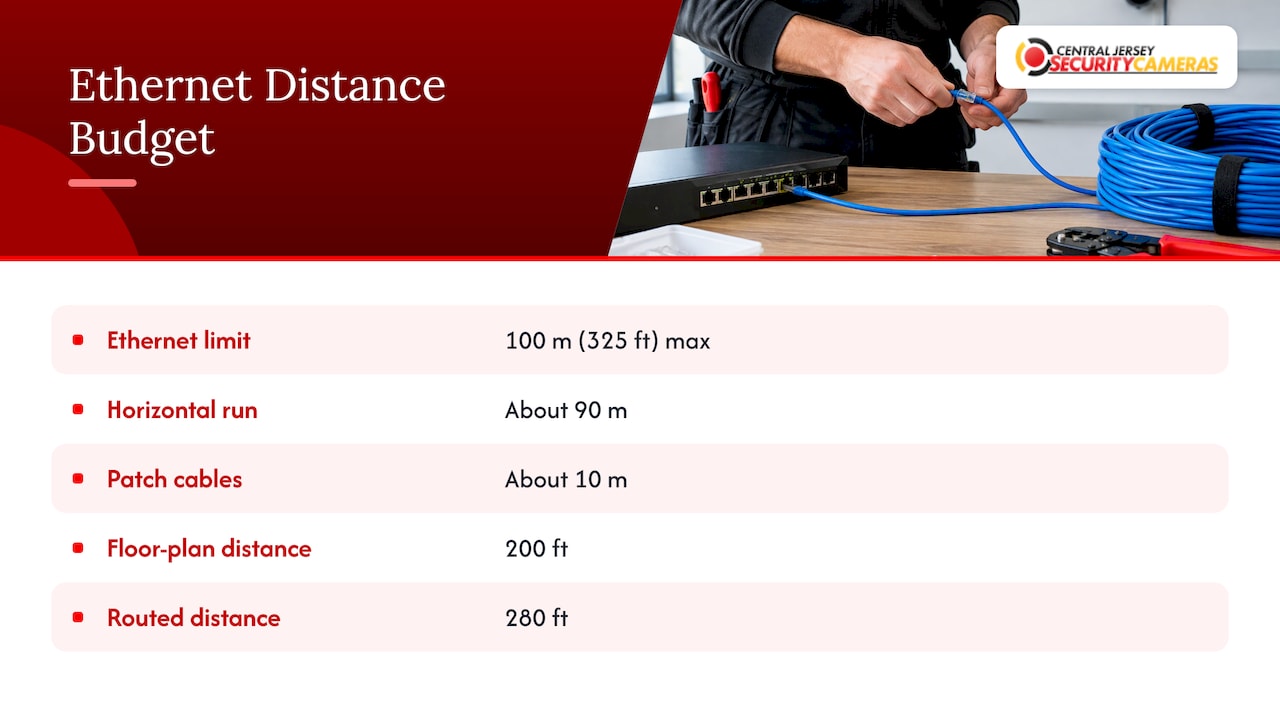
Twisted-pair Ethernet has a hard ceiling. Axis states that the total distance between transmitter and receiver cannot exceed 100 m (325 ft), and suggests budgeting about 90 meters for the horizontal run and 10 meters for patch cables. In feet, that is roughly 295 feet of installed cable and 33 feet of patch cords.
Measure the real route, not the straight line. A camera that looks 200 feet from the recorder on a floor plan can be 280 feet by the time the cable climbs a wall, crosses a ceiling and drops down a corner. Always leave slack for service loops on top of that figure.
Plan the routes before you pull anything
A tidy install is mostly planning. Before any cable is pulled, walk the building and decide where the recorder or rack goes, where each camera mounts, and which path each cable takes.
- Mark camera positions first. Cable follows the camera, not the other way around.
- Choose one trunk path. Group cameras by zone so cables share the same route to the rack or switch.
- Identify obstacles. Fire-rated walls, HVAC ducts, electrical panels and fluorescent fixtures all change the route.
- Decide the entry points. For outdoor cameras, pick where the cable passes through the wall and keep that spot out of direct rain exposure.
- Number every camera. Use the same number on the camera, the cable ends, the patch panel port and the recorder channel.
In commercial buildings, drop ceilings and open joist bays make routing easy but also tempt people to lay cable loose on the tiles. We avoid that, and you should too, for the reasons in the next section.
Routing and securing cable indoors
Keep it away from power and interference
Axis advises against running network cabling next to mains electrical cabling, hanging it from ceiling tiles, or securing it with metal staples or tightly adjusted wraps. The same guide says not to bend network cable into a radius tighter than four times the cable diameter.
For spacing, BOESE suggests avoiding long parallel runs alongside high-voltage lines, and keeping network cables at least six inches from fluorescent ballasts and motors. Where a crossing with power is unavoidable, cross at a right angle rather than running side by side.
Support the cable, do not strangle it
Good support means the cable hangs from something purpose-made and cannot sag or swing.
- Use J-hooks, cable trays, conduit or raceway rather than ceiling tiles or ductwork.
- Place anchor points about every 18 to 24 inches on exposed runs, as BOESE recommends.
- Bundle by zone or switch port so that a technician can pull one group without disturbing others.
- Snug the ties, but do not crush the jacket. A tie should slide a little along the bundle. Over-tightening deforms the pairs inside and can quietly cut performance.
- Hook-and-loop straps are forgiving in the rack and in ceilings where cables get re-touched often.
Leave slack and label it
Leave a small service loop at each camera and at the rack. It gives you room to re-terminate a connector without pulling a new cable. Label both ends with the camera number and location. A year later, when a camera goes down, a labeled cable turns a two-hour search into a two-minute check.
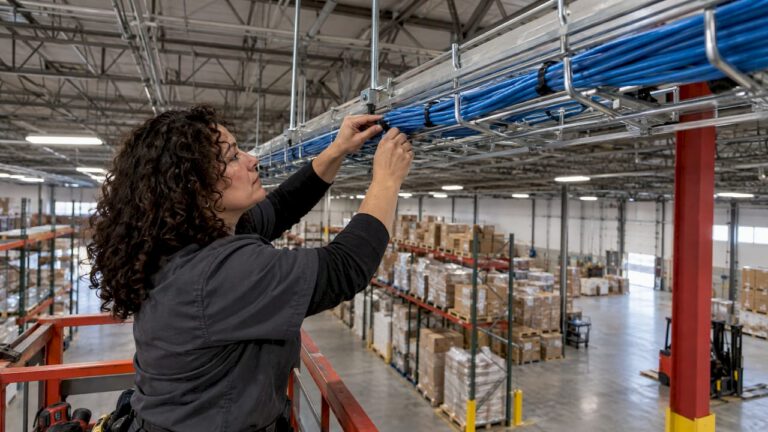
If you want to see what this looks like on a real job, this photo of a technician routing security camera cables inside a building shows the principle: one organized path, supported, with no loose runs.
Outdoor runs: weather, sunlight and wildlife
Outdoor cable fails slowly. Sunlight makes cheap ties brittle, water finds the connector, and rodents chew exposed jacket. Management here is mostly protection.
Use outdoor-rated materials
- Cable: Choose outdoor or direct-burial-rated cable where it is exposed to weather or buried. Indoor cable breaks down in sunlight.
- Ties: BOESE advises UV-stabilized or PA66W-rated ties outdoors. Standard ties turn brittle and snap within a season or two.
- Entry points: Use properly sized nylon cable glands where the cable enters a housing or junction box so water cannot follow the cable inside.
- Conduit: Where cable is within reach, run it in conduit. This protects from tampering and chewing as well as weather.
Our page on which outdoor cable protection actually stops damage goes deeper on conduit, raceway and sleeving choices.
Add a drip loop to every camera
A drip loop is a short downward curve in the cable just before it reaches the camera or enters the wall. Rain running down the cable collects at the bottom of the loop and drips off instead of tracking into the connector. It takes 30 seconds and is the step most often skipped.
Route the cable so that water cannot pool on it, and never let a connection sit at the lowest point of a run.
Think about New Jersey weather
Central New Jersey sees hot summers, freezing winters and the occasional coastal storm in Ocean and Monmouth counties. Cable sees expansion, ice and wind-driven rain over a year. Every outdoor termination should be inside a weatherproof enclosure or sealed housing, and every cable should be supported often enough that wind cannot make it swing and rub against a corner.
Organizing the rack or recorder closet
The rack is where messy cabling is most visible, and where it hurts most when something fails. Whether it is a full 19-inch rack or a wall-mounted cabinet, the same principles apply.
Use a standard layout
Brooklyn Low Voltage Supply recommends a top-to-bottom order like this:
- Patch panels at the top
- Horizontal cable managers
- Switches (PoE and network)
- NVRs, controllers and other gear
- UPS and power distribution at the bottom
The same source calls power the number one failure point in low-voltage racks, which is a good reason to keep a UPS at the bottom and give it its own clearly labeled feed. A UPS also lets the recorder shut down cleanly in an outage instead of risking corrupted footage.
Managers, color and spare room
- Put a horizontal manager between each patch panel and switch so short patch cords have a tidy path.
- Add vertical managers on both sides for the vertical runs.
- Respect the bend radius. Do not force cable into tight turns behind the panel.
- Color-code by function, for example one color for camera uplinks and another for network uplinks.
- Leave empty rack units and spare patch panel ports. Cameras get added, and a rack that is full on day one becomes a tangle by year two.
- Keep power cords away from data cables inside the rack.
- Keep a printed port map inside the cabinet door.
Airflow matters too. A PoE switch feeding a dozen cameras gives off real heat, so do not block vents with slack cable, and leave room around the recorder so its fans can work.
When fiber makes sense for security cameras
If you searched for fiber optic CCTV, the short version is this: fiber solves distance and interference, but not power.
Copper Ethernet stops at 100 m. Axis reports that fiber can run from 10 km up to 70 km depending on the fiber type, with data rates up to 10,000 Mbit/s. It also is not affected by electrical noise the way copper is, which helps near heavy machinery or between buildings on a campus.
Typical places fiber earns its cost
- A detached garage, barn or outbuilding far from the main building
- Warehouses and industrial yards with long distances between cameras and the recorder
- Parking lots, school campuses and multi-building commercial properties
- Runs between buildings, where copper can pick up surges
Axis also points out that while fiber costs more per meter than copper, it can avoid the expense of repeaters at long distances, which can make it cost-efficient on very long runs.
The power question
Glass does not conduct electricity, so PoE cannot travel over fiber. OPELINK describes three common designs: fiber to a remote PoE switch, PoE media converters with a built-in injector, and hybrid cables that combine fiber with copper power conductors.
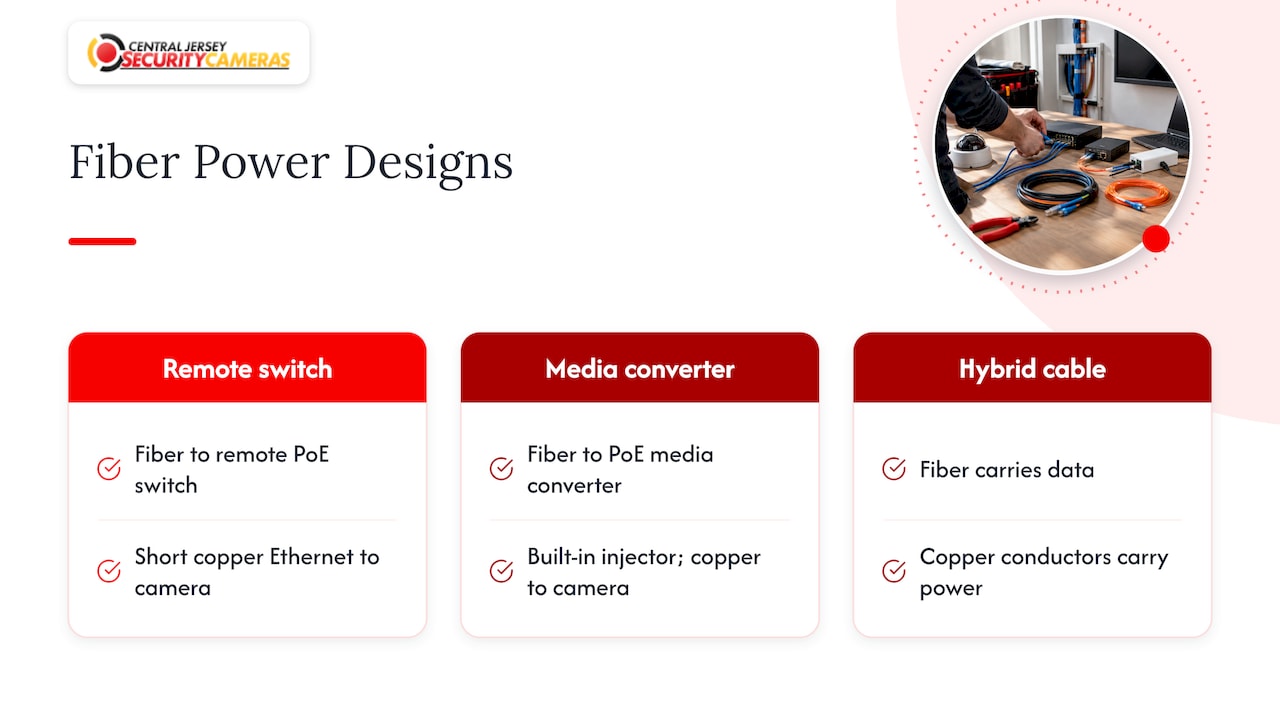
For a high-resolution camera beyond 100 m from the main switch, the usual layout is fiber from the recorder room to a remote PoE switch or media converter, then short copper Ethernet from there to the camera. Plan a power outlet or protected circuit at that remote point and put it on the same labeling system as everything else.
For networks that must reach across a campus or between sites, extending camera networks beyond Ethernet distance takes careful switch and uplink design as well as the right cable.
Inspecting and maintaining camera cabling
Cabling is the part nobody looks at until the picture fails. A short routine catches problems early.
Axis recommends weekly checks of fields of view and recording, a monthly inspection of wiring and connections for wear, fraying or damage, and a quarterly audit that includes housings, corrosion, firmware and backup power.
What to look for during a walk-through:
- Cracked, chewed or sun-faded jackets on exposed runs
- Ties that have gone brittle or are cutting into the cable
- Water or corrosion inside junction boxes and at glands
- Loose or corroded connectors
- Cable sagging, swinging in wind or rubbing on edges
- Labels that have peeled or faded
One diagnostic tip: a picture that flickers or breaks up, especially in wind or rain, usually points to a cable or connector, while a steady fault more often points to hardware. Check the connector and the run first before swapping a camera.
Record any change in your port map. The best documentation is the one that stays current.
Perspective: why we pull cable the way we do
Cable is the part of a camera system customers never see, and it is the part we spend the most care on. We design every system around the property, so the route, the cable type and the rack layout are decided before the first camera goes up.
Our view is simple: a camera is only as reliable as the cable behind it. That is why we favor professionally planned IP systems with clean PoE runs, labeled ends and a tidy recorder location, and why we back them with ongoing local service. When a camera needs attention three years from now, a technician should be able to follow the cable and fix it fast.
If you are weighing a project, a free on-site evaluation lets us walk the actual routes, check distances and tell you what the cabling will involve before anything is signed.
Tom
Let us handle the cabling
We design, install and maintain custom CCTV and IP camera systems for homes and businesses across Central New Jersey, including Ocean, Monmouth, Middlesex, Mercer and Burlington counties. That includes cable routing, recorder setup and ongoing support. Our security camera installation page lists a one-time installation fee of $99, and we offer free on-site evaluations.

Business owners with larger sites can start with our commercial security installations, and homeowners can see our home security installation service.
FAQ
What is the best way to hide CCTV cables?
Run them inside walls, attics or conduit wherever the building allows, and use paintable raceway on surfaces where you cannot go through. Outdoors, conduit and sealed entry points hide the cable and protect it at once. Always add a drip loop before a cable enters a wall or housing.
How far can a security camera cable run?
Ethernet for IP cameras is limited to 100 m (325 ft) in total, including patch cords. Longer runs need a midway switch or fiber. Coax limits depend on the cable type and camera format, so confirm them for your equipment before pulling.
Can fiber optic cable power a security camera?
No. Fiber carries data only, so the camera needs power from a local source, a PoE switch or media converter at the far end, or a hybrid cable with copper power conductors.
How should I organize cables in a rack?
Put patch panels at the top, then horizontal managers, switches, the NVR and finally the UPS and power distribution at the bottom. Add vertical managers on the sides, color-code by function, label both ends and leave spare capacity for future cameras.
How often should I check camera cabling?
A monthly look at wiring and connections for fraying, wear or damage is a good habit, with a deeper quarterly check of outdoor housings, junction boxes and backup power.
Sources
- Cable Choice Can Make or Break a CCTV System, Security Sales & Integration
- Top ten installation challenges, Axis Communications
- Camera Cable Management That Cuts Install Time, BOESE
- Security Camera Wiring: Ultimate Installation Guide, eufy
- How to Design a Reliable Low-Voltage Rack Layout, Brooklyn Low Voltage Supply
- Long-distance surveillance, Axis Communications
- Fiber Optic CCTV & Security Surveillance Guide, OPELINK
- Why security camera maintenance matters, Axis
Recommended
- 1786671194634_Technician-testing-network-cables-for-surveillance-system – Central Jersey Security Cameras
- CCTV Interference: Two Checks Property Owners Can Run in Minutes
- 1789964892033_Installer-inspecting-exposed-camera-cable-route – Central Jersey Security Cameras
- 1787211159594_Technician-wiring-Ethernet-cable-outdoors – Central Jersey Security Cameras